Please note that your subscription plan determines the specific set of features available to you, which may result in differences between what you see and the images presented in this article. You may also have existing Google Cloud projects or Service accounts set up, and that may also affect what you see on screen.
You must be a Global or Location Admin logged into your web admin portal to configure this integration on the Greetly side. To configure the Google side, you will need to have the appropriate permissions for your organization, including access to authorize domain-wide delegation.
Creating a Project
It should be noted that you can use an existing Google Cloud project for this integration.
Open the Google Cloud Platform dashboard for your organization.
Select the dropdown menu beside Google Cloud Platform.
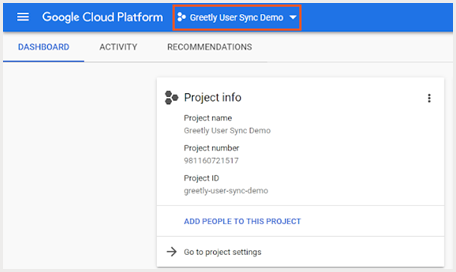
A new window then opens.
Select New Project.

Enter a name for your project. For the purposes of this article, we have chosen Greetly User Sync Demo.

Activating the Admin SDK API
Enter Admin SDK API into the search bar in the Cloud Platform dashboard and then select this option from the dropdown.
 A new window then opens.
Select the blue button.
- If the button displays Enable, you will need to wait for the API to be enabled.
- If the button displays Manage, then you will be moved onto the next step.

The APIs & Services screen then opens.
If you are not automatically redirected to the APIs & Services screen, check out the Troubleshooting section here for more guidance.
Creating the Service Account
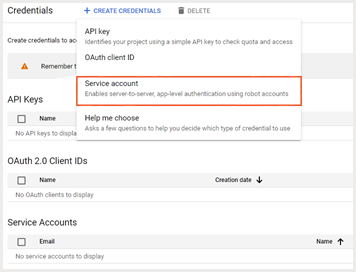
From the APIs & Services screen, select Credentials.

The Credentials screen then opens.
Select Create Credentials.

Then select Service account from the dropdown menu.
Enter a name for the Service Account.
For the purposes of this article, we chose “Greetly sync demo service account”.
Select Done.

You will then be redirected to the Credentials screen.
Select the Service account you just created.

The Service account page then opens.
Expand the Advanced settings dropdown and copy the Client ID number as you will need it later on in the process.

Then select the Keys tab.

From the Keys tab, expand the Add Key menu, and select Create new key from the dropdown.

The Create new key window opens.
Ensure the key type is set to JSON.
Then select Create.

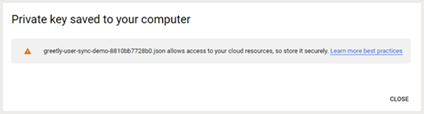
The private key is automatically saved to your device as a .json file.
Take note of this file's location, as you will need it later on in the process.
Configuring Domain-wide Delegation for the Service Account
Return to the Google Cloud Platform dashboard.
Enter API controls into the search bar, and then select this option from the dropdown.

The API controls screen then opens.
Select Manage domain wide delegation.

The Domain wide delegation screen then opens.
Select Add new to open a pop-up window.

Enter the Client ID you copied earlier.
Insert the three fields from the links below into the field Oauth scopes (comma-delimited).
- https://www.googleapis.com/auth/admin.directory.user.readonly
- https://www.googleapis.com/auth/admin.directory.group.readonly
- https://www.googleapis.com/auth/admin.directory.orgunit.readonly

Setting Up the Integration in Greetly
Log into your Greetly web admin portal.
Select App Settings from the top navigation bar.

The App Settings screen then opens to the Check-in options tab.
Select the Location tab.

Select Location Integrations.
The Location Integrations panel opens on the right-hand side of the screen.
Toggle Enable Google Directory Integration on.

Open the JSON file that you saved earlier.
Copy and paste the entire contents of this file into the field Google Directory Service Account json data.

Enter the email address for the account created to set up the integration into the field Google Directory admin email.
Enter the term "user, group" into the Google Directory scopes field.

You are now ready to sync users.
Syncing Users
Options for syncing users include:
- All users
- Users in selected groups
- Organizational units
- Both groups and organizational units
Sync All Users
If you need to sync all users, leave the Google directory groups field blank and skip to Syncing Users in Greetly.
Syncing Groups
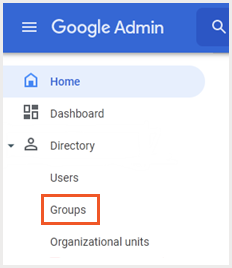
Return to your Google Admin account.
Under Directory, select Groups.
To sync a group, open its management page and copy its URL.

Enter the information that follows "groups/" from the URL into the Google Directory Groups field. To enter multiple groups, separate each entry with a comma, as shown in the example below.

Now head to this step.
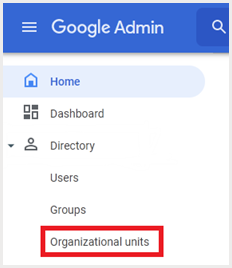
Sync Organizational Units
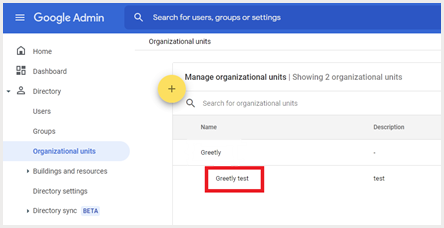
To sync only organizational units, select Organizational units under Directory on your Google Admin screen.
Then select the organizational units that you’d like to sync. For the purposes of this article, we have used "Greetly test".
Syncing Users in Greetly
Return to the Greetly web admin portal.
On the Integrations Settings panel, add a backslash (/) to the organizational unit name and enter it into the Google Directory organization units field.

To enter multiple groups, separate each entry with a comma.
Remember to Save.Then select Manage Users from the top navigation bar.

The Manager Users screen then opens.
Select Sync from Google Directory.

Please note that it may take some time to sync larger directories.
Troubleshooting
If you’re having trouble setting up the integration, one option is to create a new Google Cloud Platform and try again.
If users do not appear in the directory, view the logs located near the bottom of the Location tab screen.

Possible error message may include:
- Google Directory users import completed. Added 0 users. At [time in UTC]
- In this case, your groups or organizational units may not contain any users
- Google Directory users import completed with error: undefined method `[]' for nil:NilClass at [time in UTC]
- In this case, you may have inputted an invalid group ID.
If you need further assistance setting up this integration, please contact Greetly support.